This tutorial assumes the reader has intermediate knowledge on how to UV polygonal models using Maya. In it I will show how I create and layout a 2nd UV set for use as the model's Light map.
Step 1: Select the model you’d like to create a new Light Map for. I've chosen this wall section for the Mars Colony Space Station.
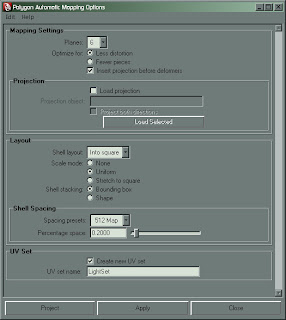
Step 2: Create a new UV set for your model using an Automatic Map
Polygons – Create UVs – Automatic Mapping Options
Select the following options:
- Planes: 6
- Optimize for: Less Distortion
- Shell Layout: Into Square
- Scale Mode: Uniform
- Shell Stacking: Bounding Box
- Spacing Presets: Change this to the size map you’re going to use
- Create New UV Set: Yes
- UV Set Name: LightSet

Step 3: Navigate to the UV Texture Editor, and select all edges, then Cut UV Edges
UV Texture Editor - Cut UV Edges
Step 4: Select all edges, then use the Layout Options
UV Texture Editor - Layout
Select the following options:
- Layout multiple objects: Non-overlapping
- Shell Layout: Into Square
- Scale Mode: Stretch to Square
- Shell Stacking: Shape (Note that when I took the screenshot, I still had bounding box selected. Using Shape as opposed to Bounding Box appears to produce better results)
- Rotate: None
- Spacing Presets: Change this to the size map you’re going to use
My finished product is shown below, yours should appear similar. Unlike a color or normal map, our UV edges don't necessarily need to lay out together. This is because we will be using a Batch process to generate the lighting. To create your new light map, add lights and do a Batch Bake using Mental Ray. Hope this is helpful!


0 comments:
Post a Comment